From the desk of David Klaus, Director at Briggs Racing.
The 206 crate engine is built from a dedicated platform engineered and designed for racing. Even engineered for a brutal environment and built by hand to assure the highest level of craftsmanship, the experience you have still comes down to making the right choices. This simple guide is intended to help you navigate through the most common mistakes so that you can enjoy what racing is all about!
The common mistakes that a racer makes:
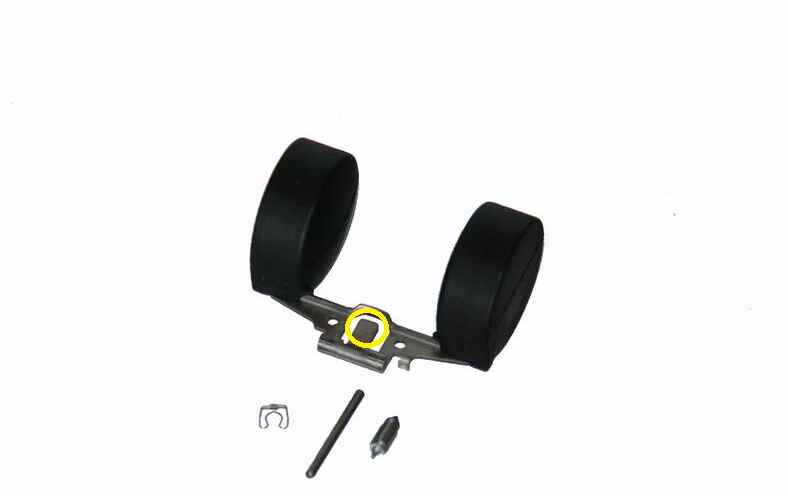
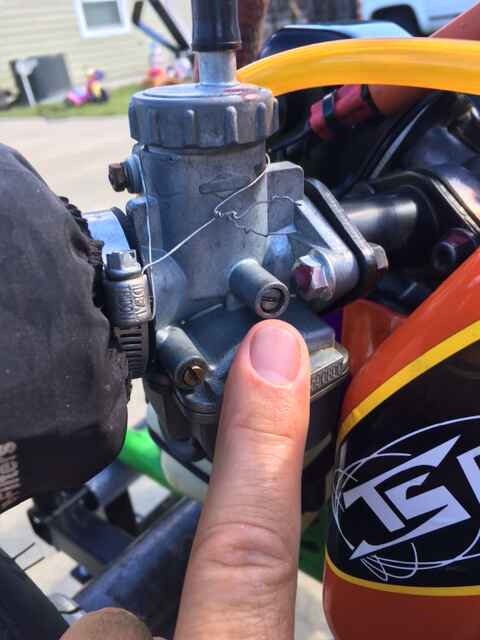
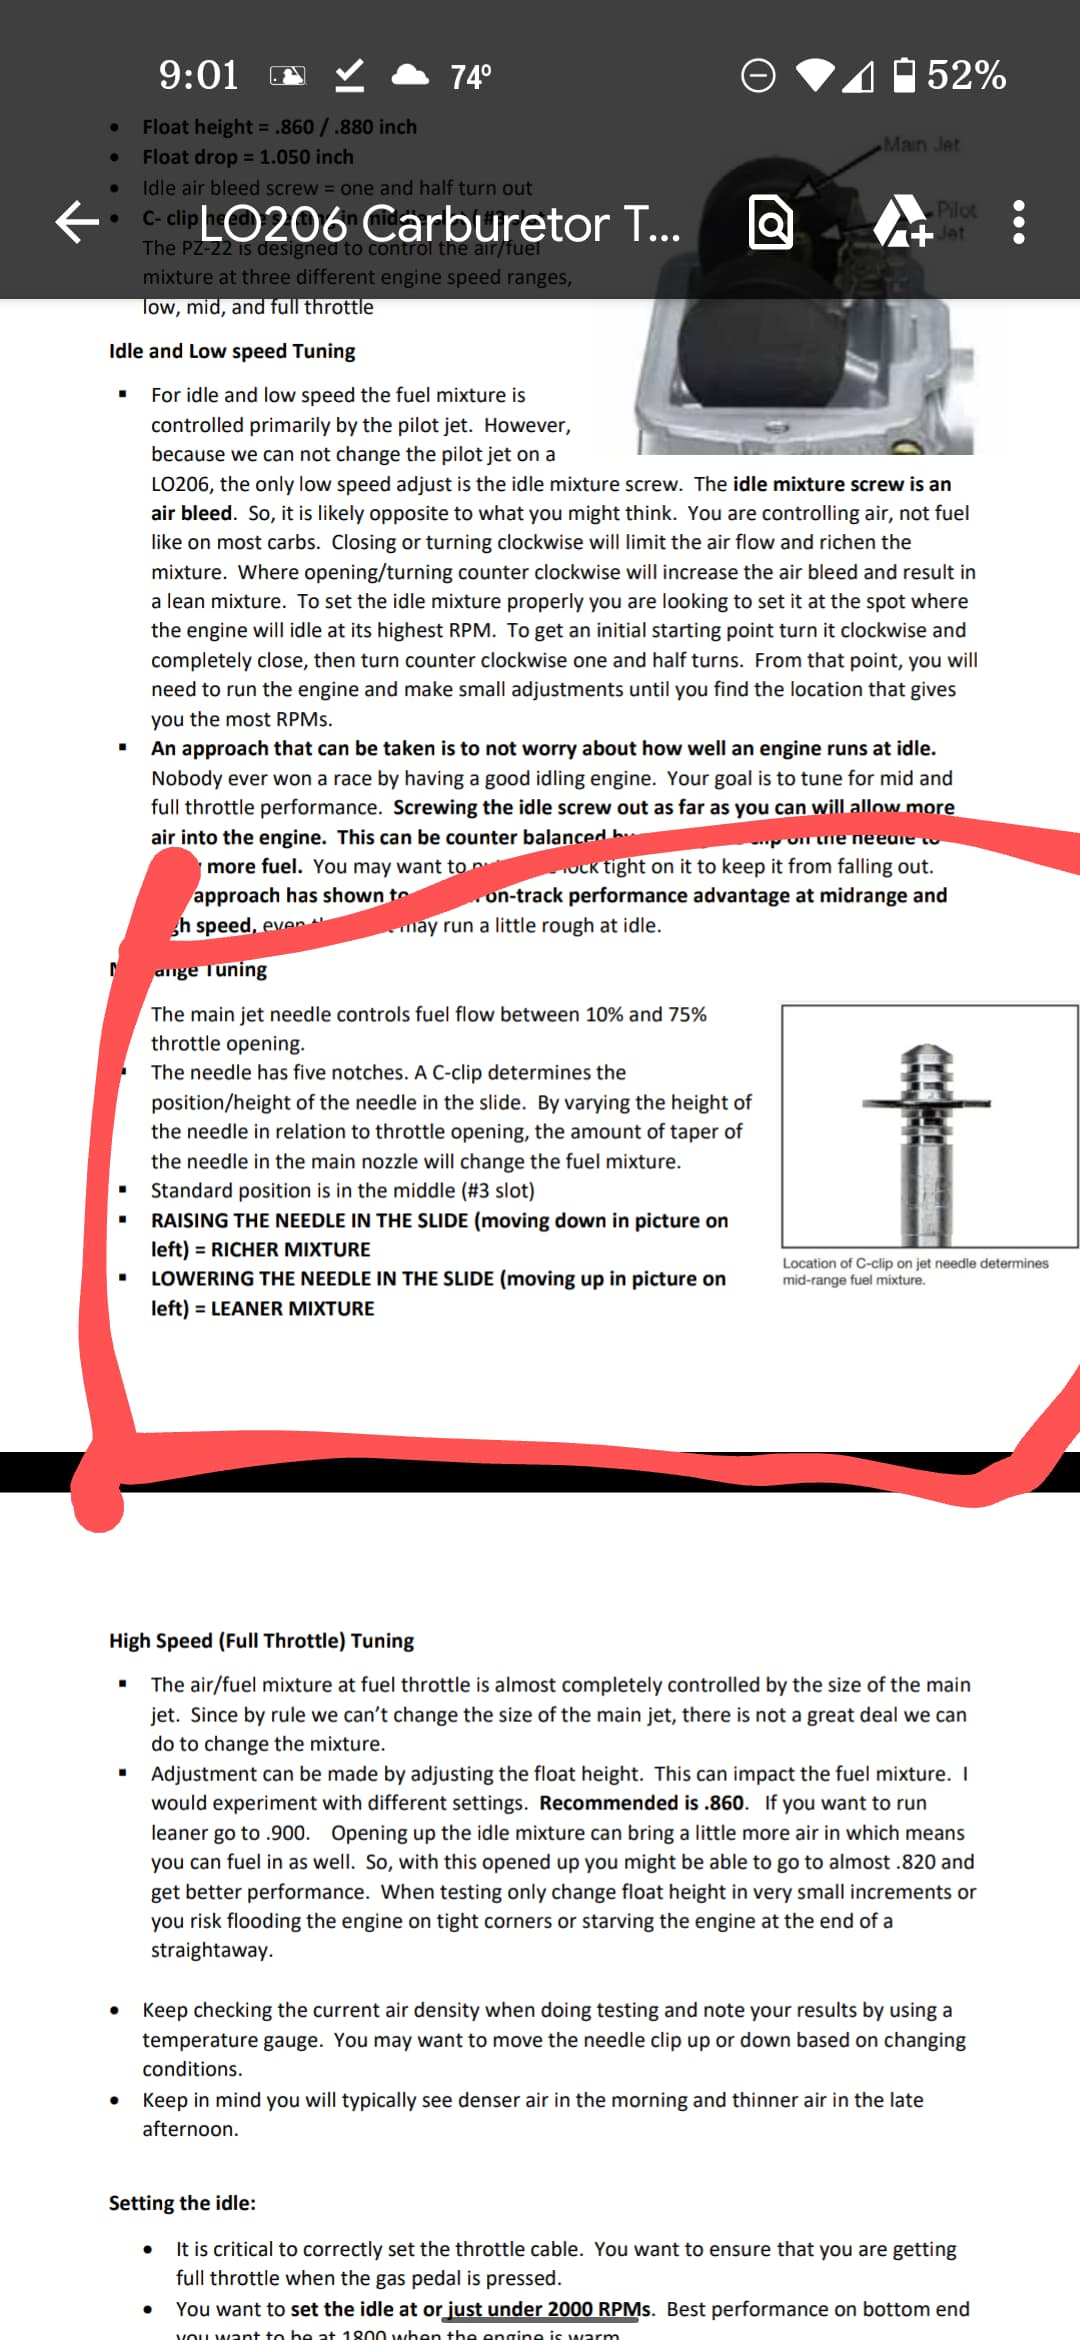
1. Not setting the float level upon first installing your engine resulting in poor engine performance.
- After our labor of love leaves us your local parcel carrier will push, shove, and possibly even drop your engine changing the factory float setting in your carburetor.
- Float height is critical to engine performance as it controls the amount of fuel in your carburetor bowl by controlling the opening and closing of the inlet needle (fuel supply from your fuel pump). Too much fuel can cause bogging or a sluggish throttle response. Whereas not enough fuel will elevate your engine operating temperatures and top end performance will suffer as the engine starves for fuel.
- On our website, BriggsRacing.com, we have a video tutorial on how to set your float height.
- Also under the documents tab of our 206 section is a carburetor tuning guide. Print this out and put it in your toolbox . The PZ carburetor is a very easy to tune but knowledge is power so please take the time to read and understand.
2. Using the wrong choice of oil which can leads to premature wear, internal rust, and even failure.
- The choice of oil you use will play one of the largest roles in the performance and longevity of your engine. We recommend using only Briggs & Stratton 4T synthetic racing oil as it was specifically engineered for your race engine. 4T is readily available through any Amsoil or BriggsRacing dealer.
- Do not:
- Use ‘karting’ oils as many are simply a compressor lubricant and food coloring. They offer very limited protection, are prone to water contamination, and have a TBN of zero. This base oil is not used in any other form of racing and/or combustion engine because of these severe limitations.
- Use car or ‘race’ oils designed for automotive use. This category of oil is engineered for pressure lube systems. When used in a splash lube system they tend to foam/froth greatly reducing their ability to protect. In addition, automotive oils are engineered for the lower operating temperatures of a liquid cooled verses air cooled environment.
3. Allowing your clutch to ‘float’ WILL lead to crankshaft damage.
- Clutch manufacturers offer generic recommendations not necessarily knowing what engine or application their clutches will be used on.
- Allowing the clutch to float on your 206 engine will overloads the keyway (too much torque spread over too small of surface area) and will result in keyway damage.
- Our crankshaft is carbon steel and even so the design of most clutches offer an insufficient surface area to transfer load. In order to prevent keyway damage the clutch hub HAS to be locked against the shoulder of the crankshaft.
- We have a video on BriggsRacing.com on how to properly installing your clutch.
4. Installing your exhaust system in a bind which can result in either the bracket or exhaust pipe failure.
- When installing your exhaust always start with the cylinder head fasteners first. IF the brace does not fit flat against the cylinder head mounting boss use the washers provided to take up the space and or bend the brace carefully to fit flush. If any excess force is used installing the brace and/or exhaust fasteners this WILL over stress the exhaust system leading to breakage and/or the exhaust fasteners at the head to strip out. Bringing each fastener to final torque will naturally create a bind. Take your time and do not use the force of an impact to make the exhaust ‘fit’. Slowly work to final torque by alternating fastener torque in steps, increasing torque in stages.
5. Overwrapping your exhaust system.
- Sanctioning bodies mandate that your header system be wrapped with an approved exhaust material. When installing wrap it is important to make sure that you do not double wrap or excessively overlap of this material. This will insulate the exhaust trapping in excessive heat which can impact the strength and life of your exhaust. Do not start your header wrap until 3 inches above where the flange meets the cylinder head. Wrapping closer to the flange will trap heat elevating head temperatures that could lead to exhaust valve seat warping and/or head gasket failure.
6. Not checking valve lash after the initial break-in period.
- After your engine goes through several heat cycles valve lash has a tendency to grow as component stresses from manufacturing are relieved. We recommend that lash is checked during the first 30-60 minutes of initial run time.
- We have a video on BriggsRacing.com on how to set your valve lash.
7. Running at the rev limiter in slide restricted classes.
- When air is restricted an engine’s peak torque and horsepower occur earlier in the power band. The greater the restriction, the lower in the rpm range peak horsepower and torque will occur. Peak horsepower for the unrestricted 206 is around 5,600 rpm whereas the Green slide restrictor peak horsepower is at 4,800 rpm. Gearing past 5,300 rpm, given that the peak is 4,800 rpm with a Green slide, will result in slower lap times. Gear for the power band, not the rev limiter .
8. Using a ¼” aluminum offset motor mount plate and offsetting the motor mount plate too far.
- Excessively offsetting an engine offers very little engine stability and amplifies vibration by acting as a ‘springboard’. Engine stresses compound as the natural engine motion (which we have engineered for) falls on one plane, the flexing of the chassis on multiple planes, and your engine’s crankshaft load changes as chain tension varies as your chassis flexes.
- Install the engine with no more than a ¾ inch offset. When a ‘typical’ ½ inch plate is used and offset beyond ¾”, strain gauge tests shows up to a 20% increase in vibration measured at the valve cover. This is a TREMDOUS amount of additional vibration without taking into account any common additional sources of vibration (track surface, tire balance, bent axles, etc.). Vibration accelerates fatigue causing component failure and fastener torque loss .
- Just because an engine mount allows for a greater offset doesn’t mean you should do it! The greater the offset the more harmonics and stress on your engine block and side cover.
- Most ½ inch aluminum engine mounting plates are also machined for weight reduction allow even greater flex as the very rigidity needed is stripped away to save an ounce.
- Use a QUALITY mount. The BEST on the market is the Odenthal mount. It allows for greater offset without sacrificing rigidity. Another system would be the PMI engine mount with the ¾”engine plate verses the standard ½” plate. Typically we would not offer brand recommendations but the foundation that your engine sits on is critical to success.
- Not oiling your Green air filter before using.
- Your Green air filter is a premium filter that uses oil to effectively trap and prevent debris from entering your engine. It must be oiled before initial use (it shipped dry) and we recommend using Green air filters oil recharging system. For instructions on how to clean and oil your air filter please check out Greenfilterusa.com. Your oil filter is your only barrier to preventing debris from entering your engine. This is one of the BEST filters available but it needs to be properly oiled in order to offer you the best protection possible.
10. Not installing a fuel filter.
- Your fuel source has dirt in it, your tank has dirt in it, and installing a fuel filter will prevent debris from entering your carburetor where it can clog a jet or prevent proper fuel delivery. All of which usually happens during a race as you agitate your fuel.
11. Not properly storing your engine.
- Today’s fuel has ethanol in it. Ethanol is corrosive and attracts water. Left in your carburetor over a period of time it will form zinc and aluminum oxide as it reacts with the materials around it. Aged fuel will also ‘varnish’ on carburetor parts over time. With some simple steps this mess can be prevent.
- Fuel stabilizer – Check to make sure the addition of stabilizer (specific to ethanol fuel) does not impact the approach that your track or series uses to tech fuel.
- After an event remove the fuel line feed at the pump, open up your bottom bowl drain, and let gravity remove all the fuel into an approved fuel gas. Retighten your drain screw and take some WD-40 and spray it into your fuel line. Use enough so that it drains into your carburetor and coats internal parts for protection. Reinstall and secure your fuel line to the pump.
- If you are done for the season I would follow this same process AND leave Briggs 4T in your crankcase. Most ‘karting’ oils attract water and leaving them in your engine over a winter will cause rust and acid etching. Acid formation is a by-product of combustion that gets past the rings combining with water attracted by PAG based ‘karting’ oils. Briggs 4T has a high TBN (ability to neutralize engine combustion by-products) along with a premium rust inhibitor.
- As we are talking about fuel please use all safety precautions and only perform ‘pickling’ your engine after it has cooled down and away from any ignition sources.
12. Not focusing on your chassis setup first .
- There is a natural assumption we as racers have that lap times are solely connected with the performance of the engine. If something changes or we aren’t up to speed it has to be engine.
- While engine issues can happen it is important to learn how to diagnose and isolate ALL variables that could lead to a performance change. Most of the time it will not be engine related. Learning the dynamics of chassis set-up, the impact of a changing track surface, kart condition (bearings, axle, alignment, etc.), and the ‘feel’ of what the kart is doing from your ears to your butt in the seat will allow you to piece together from the symptoms what the cause is.
- The number one issue new racers make is misunderstanding cause and effect. That is perfectly natural and we all go through this learning curve.
- A simple example: I can’t get my engine to run over 5,800 rpm!
- Was it earlier in the day?
- Is it only in certain corners (left or right) or on parts of the track?
- What changed?
- You hit a curb?
- Your engine mount shifted causing misalignment and/or chain tension issues?
- Has it changed the toe-in of your kart in the process?
- Is your frame is cracked or bent?
- Is your axle bent?
- Has something else loosened up on your kart (from bearing carrier to a seat strut?
- There is more rubber down on the track as conditions have changed?
- This could be causing your chassis to bind
- A bind can also cause too much chassis or engine mount flexing making your chain or clutch alignment to change.
- Attention to the changing variables is one of the keys to identifying and efficiently resolving problems. While the engine could be the factor work through a systematic process to isolate your root cause. Assumptions, as they say………lol
- You hit a curb?
- A simple example: I can’t get my engine to run over 5,800 rpm!
13. Improperly plumbing your valve cover catch can.
- Another sanctioning body standard is that engine vents must be contained into a ‘catch can’ system to prevent oil from reaching the track surface. When installing your system it is important NOT to restrict the free flow of air to the valve cover vent or at your catch can to the atmosphere (open to the air).
- The function of the valve cover vent is to allow the pressure created from the piston travel to exit and enter the engine as needed. It also helps promote oil distribution to the valve train area.
- Make sure that your line is not pinched and/or restricted by even so much as a zip tie.
- Your catch can HAS to have sufficient ventilation to the atmosphere.
- A pinched line or a catch can that is improperly ventilated will create back pressure. Back pressure can impact engine performance (sluggish) and in extreme cases lead to gasket failure and/or excessive oil out of your fuel pump vent as the pressure has to go somewhere.
- Use a quality vent line with a thicker side wall to prevent collapsing or pinching common when using cheap fuel line.
14. Fuel pump routing and installation.
-
Pulsing from the crankcase requires some finesse but done properly will be problem free. Some of the key points:
- The pulse line from the engine needs to be short and direct, allowing any oil mist that migrates towards the pump to harmlessly and naturally drain back into your crankcase. Do not have low spots where oil can pool in your line and prevent the pump from functioning properly.
-
The most common issue with pulsing from the crankcase is excessive oil exiting the pump vent (the small, circular brass piece).
- Causes:
- Too much oil in the engine. We recommend 13 ounces of Briggs & Stratton 4T.
- Too much crankcase back pressure. If your valve cover breather is restricted the pressure HAS to go somewhere. This pressure commonly forcing oil through your pump and out of the brass vent on your pump.
- Review your catch can system for restrictions. Drill another hole or two in the top of your catch can, check for a pinched line anywhere from the cover to the catch can. Even a zip tie used to hold your line in place can pinch.
- Causes:
-
A strong suggestion to help reduce any mist from exiting your fuel pump vent:
If you find yourself with an issue, clean the oil from your pump vent and using either nail polish or silicone put a ‘dab’ on the screen itself. This ‘dab’ can completely cover the brass vent screen without negatively impacting the function or life of the pump . This will naturally act as a restriction to the amount of air allowed to pass through. That will lower the velocity of the air passing through and its ability to carry oil mist with it.
15. Neglecting General maintenance.
- Although the 206 is engineered for racing and life some due diligence on your part to address issues before they become problems (and cost you money).
- Some recommended checks:
- Exhaust system – Every time you come off of the track check your exhaust fasteners and safety wire. Left unchecked, a lose fastener will destroy a thread and a loose silencer will increase vibration and fatigue. Also check for any gasket leaks at the same time. A gasket leak can elevate head temperatures causing head gasket failure or head warping if not caught soon enough.
- Other preventative quick checks: Head bolts, oil drain plugs, and engine mounts
- Engine mounts tend to loosen up with chassis flex and kissing curbs leading to chain misalignment. This not only can lead to gear damage but also puts additional force on the crankshaft and side cover joint.
- Head Bolts – Regularly throughout the weekend check your head bolts for torque when the engine is COLD (220 lb.-in). Head bolts are exposed to severe heat which can be compounded by factors beyond the engine (chassis bind, chain misalignment, exhaust gasket leak, etc.). Left unchecked a loose head bolt can cause a head gasket leak. Any head gasket leak will cause a performance loss but severe enough and exhaust gases over time can destroy both the head and cylinder surface.
- Drain fill plugs – If not torqued properly, well, enough said. J
- Not tapping into the awesome community of 206 racers to gain knowledge and ask questions.
- Some recommended checks:
16. Not tapping into the awesome community of 206 racers to gain knowledge and ask questions.
Follow our Briggs & Stratton Racing Facebook page as well as other 206 enthusiast pages.
Stop by our website and ask a question on our forum (www.BriggsRacing.com)…
(or start a new topic here on the KP forums  )
)
Join our Briggs & Stratton Racing Facebook page as well as other 206 enthusiast pages.
Summary:
Racing has a learning curve. We all start with ZERO knowledge and through reading, asking questions, and meeting friends at the track we reach learn. Don’t get discouraged, this is a family and we share a common passion. While I might or might not end a weekend on the podium (usually not) it’s the comradely, friendships, fun and adrenaline that you can’t find anywhere else.